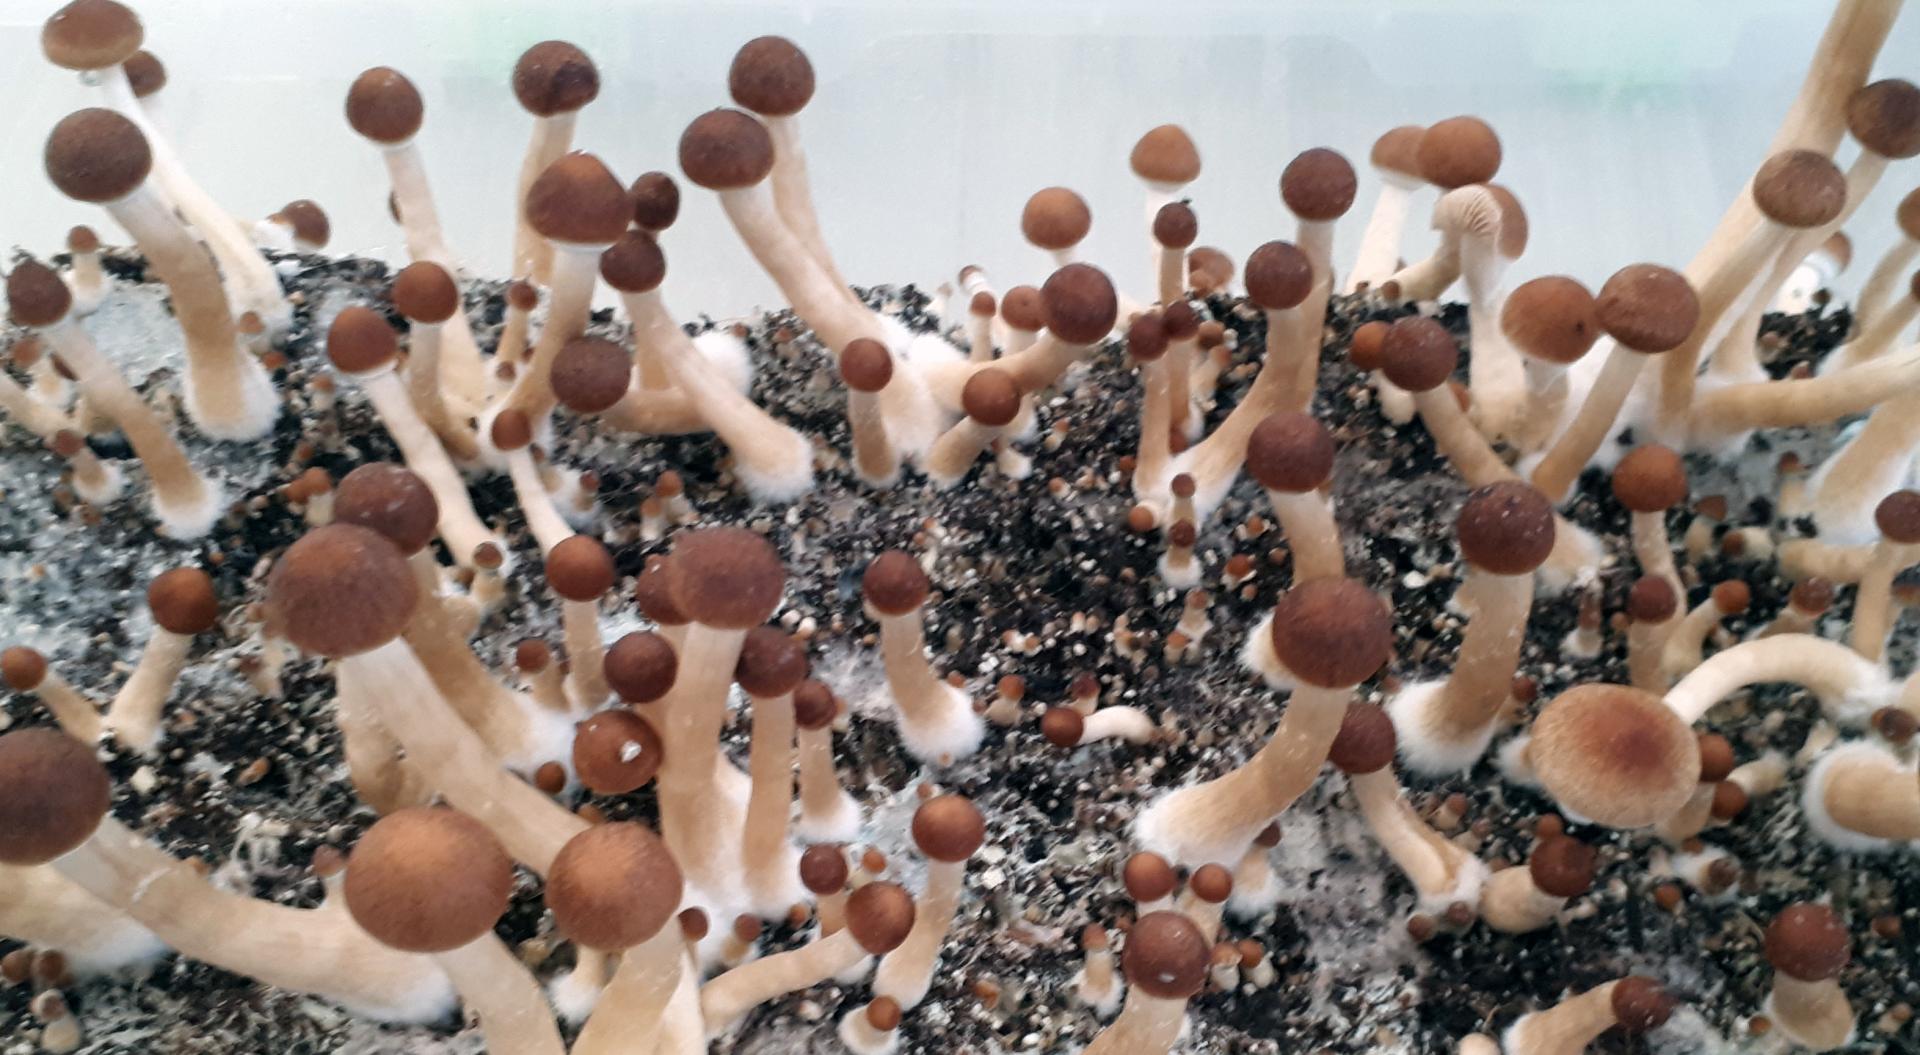
Golden Teacher is the most popular strain among Psilocybe Cubensis psilocybin mushrooms. This is due to the simplicity of its cultivation and the value of its biochemical composition, namely the "philosophical insight" that these "golden teacher mushrooms" carry!
Growing psilocybin mushrooms - Golden Teacher (Psilocybe Cubensis) how to grow it
From spore impression to fruiting bodies, there are several stages to growing these miracle mushrooms:
- Spore - Obtaining spore inoculum from a print
- Substrate - Preparation of substrate for growing mushroom mycelium from grain
- Mycelium - Inoculation of sterilized substrate with spore inoculum
- Caseing - Preparation of substrate for growth of fruiting bodies and inoculation of mycelium into the resulting coconut fiber substrate
- Fruiting - Creating conditions for fruiting bodies to grow in several waves
- Harvesting - Creating spore imprints and drying the mushrooms for long term storage
The 100% key to success is a quality spore print and sterility during the mycelium inoculation stage of the process
How to grow psilocybin mushrooms?
1) Obtaining spore seed from Golden Teacher print 2 days old
Spore print can be easily purchased online from many spore and seed stores. Spore print should be as fresh and dark as possible without fail. A barely light or old dry print will not have enough energy to grow in the mycelial substrate. You will need:
- Spore print on paper/foil in a zipper bag
- Sterile syringe 10 ml
- Sterile water in a 10 ml ampoule (available at the pharmacy)
Observance of sterile conditions does not hurt, so we recommend the following actions. Wear sterile gloves or wipe disposable gloves with alcohol and use a face mask. Wipe the table within the working radius with alcohol. If possible, work 15-30 cm from the flame of a burner or stove, but it is not necessary. Using a sterile syringe, draw sterile water, which is poured through the puncture into the bag with the print. Without taking out the needle, light movements on the print, wash off the spores from the carrier. At this point you will see the quality of the print. If the spores are easily washed off the print with water, and the touch of the needle completely removes the spores, then the print is fresh and fully suitable for sowing. If, however, you have to scrub the spores with a needle to wash them off, then it is better not to use the print in the first place! Once the spores have been washed off, draw the spore-water mixture back into the syringe and only then take the needle out of the bag and put the cap back on quickly. This syringe with the spore suspension is placed in a dry, dark place at room temperature for 24-48 hours. It is better to let the spores hydrate, i.e. activate for 48 hours! It is better to make a flush of spores in the evening, the next day also in the evening begin to deal with the substrate for mycelium, namely its soaking overnight.
2) Preparation of substrate for growing mycelium of Golden Teacher mushrooms from grain (time included in the activation of spores)
You can use wheat and oat grain as a substrate, but they are prepared differently. You will need:
- 2 liter jars with metal lids that screw on (you can buy pickles in the supermarket in such jars)
- aluminum food foil
- vermiculite not a large amount (store for plants, take 1 liter - the rest of the vermiculite will go to the keying)
- wheat / oats 1-2 kg - grain must not be cleaned, not ground!!!!
- pressure cooker
- ordinary pot for boiling grain
Dry not cleaned and not polished grain rinse with running water, remove debris and empty / rotten grains. Soak in clean water for 6 - 12 hours. This is done in the evening, on the second day after the spore print work. On the morning of the next third day, we drain the rest of the water, add clean water and cook the grain in a pot. For oats, drain the water with the empty grains that floated to the surface of the water after a night of soaking. For wheat, cook 10-25 minutes after the water boils - IMPORTANT that the percentage of wheat kernels opened is no more than 2% of the total grains in the pot. Oats are cooked for 5 minutes after boiling. After boiling, both types of grain are rinsed with clean water. We rinse the grain in a drušlag, where we leave the grain after rinsing for 10 minutes to drain the excess water. Then pour the grain from the drushlag onto a clean cotton or paper towel, so that the excess water is absorbed even more. Dry for another 10 minutes. There is an option for additional microwave drying - twice for 4 minutes at 600 watts, shaking after each time. But this option is not necessary if you have strained the water well through a colander and a towel. Microwaving unnecessarily over-dries the grains.
In empty jars pour 1 cm of vermiculite on the bottom. Boiled and dried grain poured into liter jars on 1/2 or 3/4 over vermiculite, do not mix! Put the prepared lid on top. Preparation of the lid is as follows: nail through a hole and scissors / knife to cut out a square 1 * 1 cm, inwardly bent corners that did not stick out. Put a cotton disk on top and cover it from the outside with tape on all sides, leaving open only tentatively the place where the lid was punctured. Cover the jars with grain and lids with foil and with your hands as "dumpling molding" tuck the foil around the lid, on top of the jar.
At the bottom of the pressure cooker put a piece of cotton cloth in 1-2 layers, put the jars on top and pour hot water to the level of grain in the jars! After boiling (first the pressure cooker hisses with air and then the valve snaps shut) the grain in the jars is sterilized for 1 hour! After an hour, do not open the pressure cooker, but carefully transfer it to cold water (in a basin or bathtub). So the pressure cooker should stand until it cools down completely. If you did this in the morning, then by evening the grain will be ready for inoculation. At the same time, the spores in the syringe will already be approximately 48 hours. This is the evening of the third day from the beginning of work.
IMPORTANT: Wet substrate will lead to souring of the mycelium in the future and mold growth. Dry substrate will prevent spores from germinating.
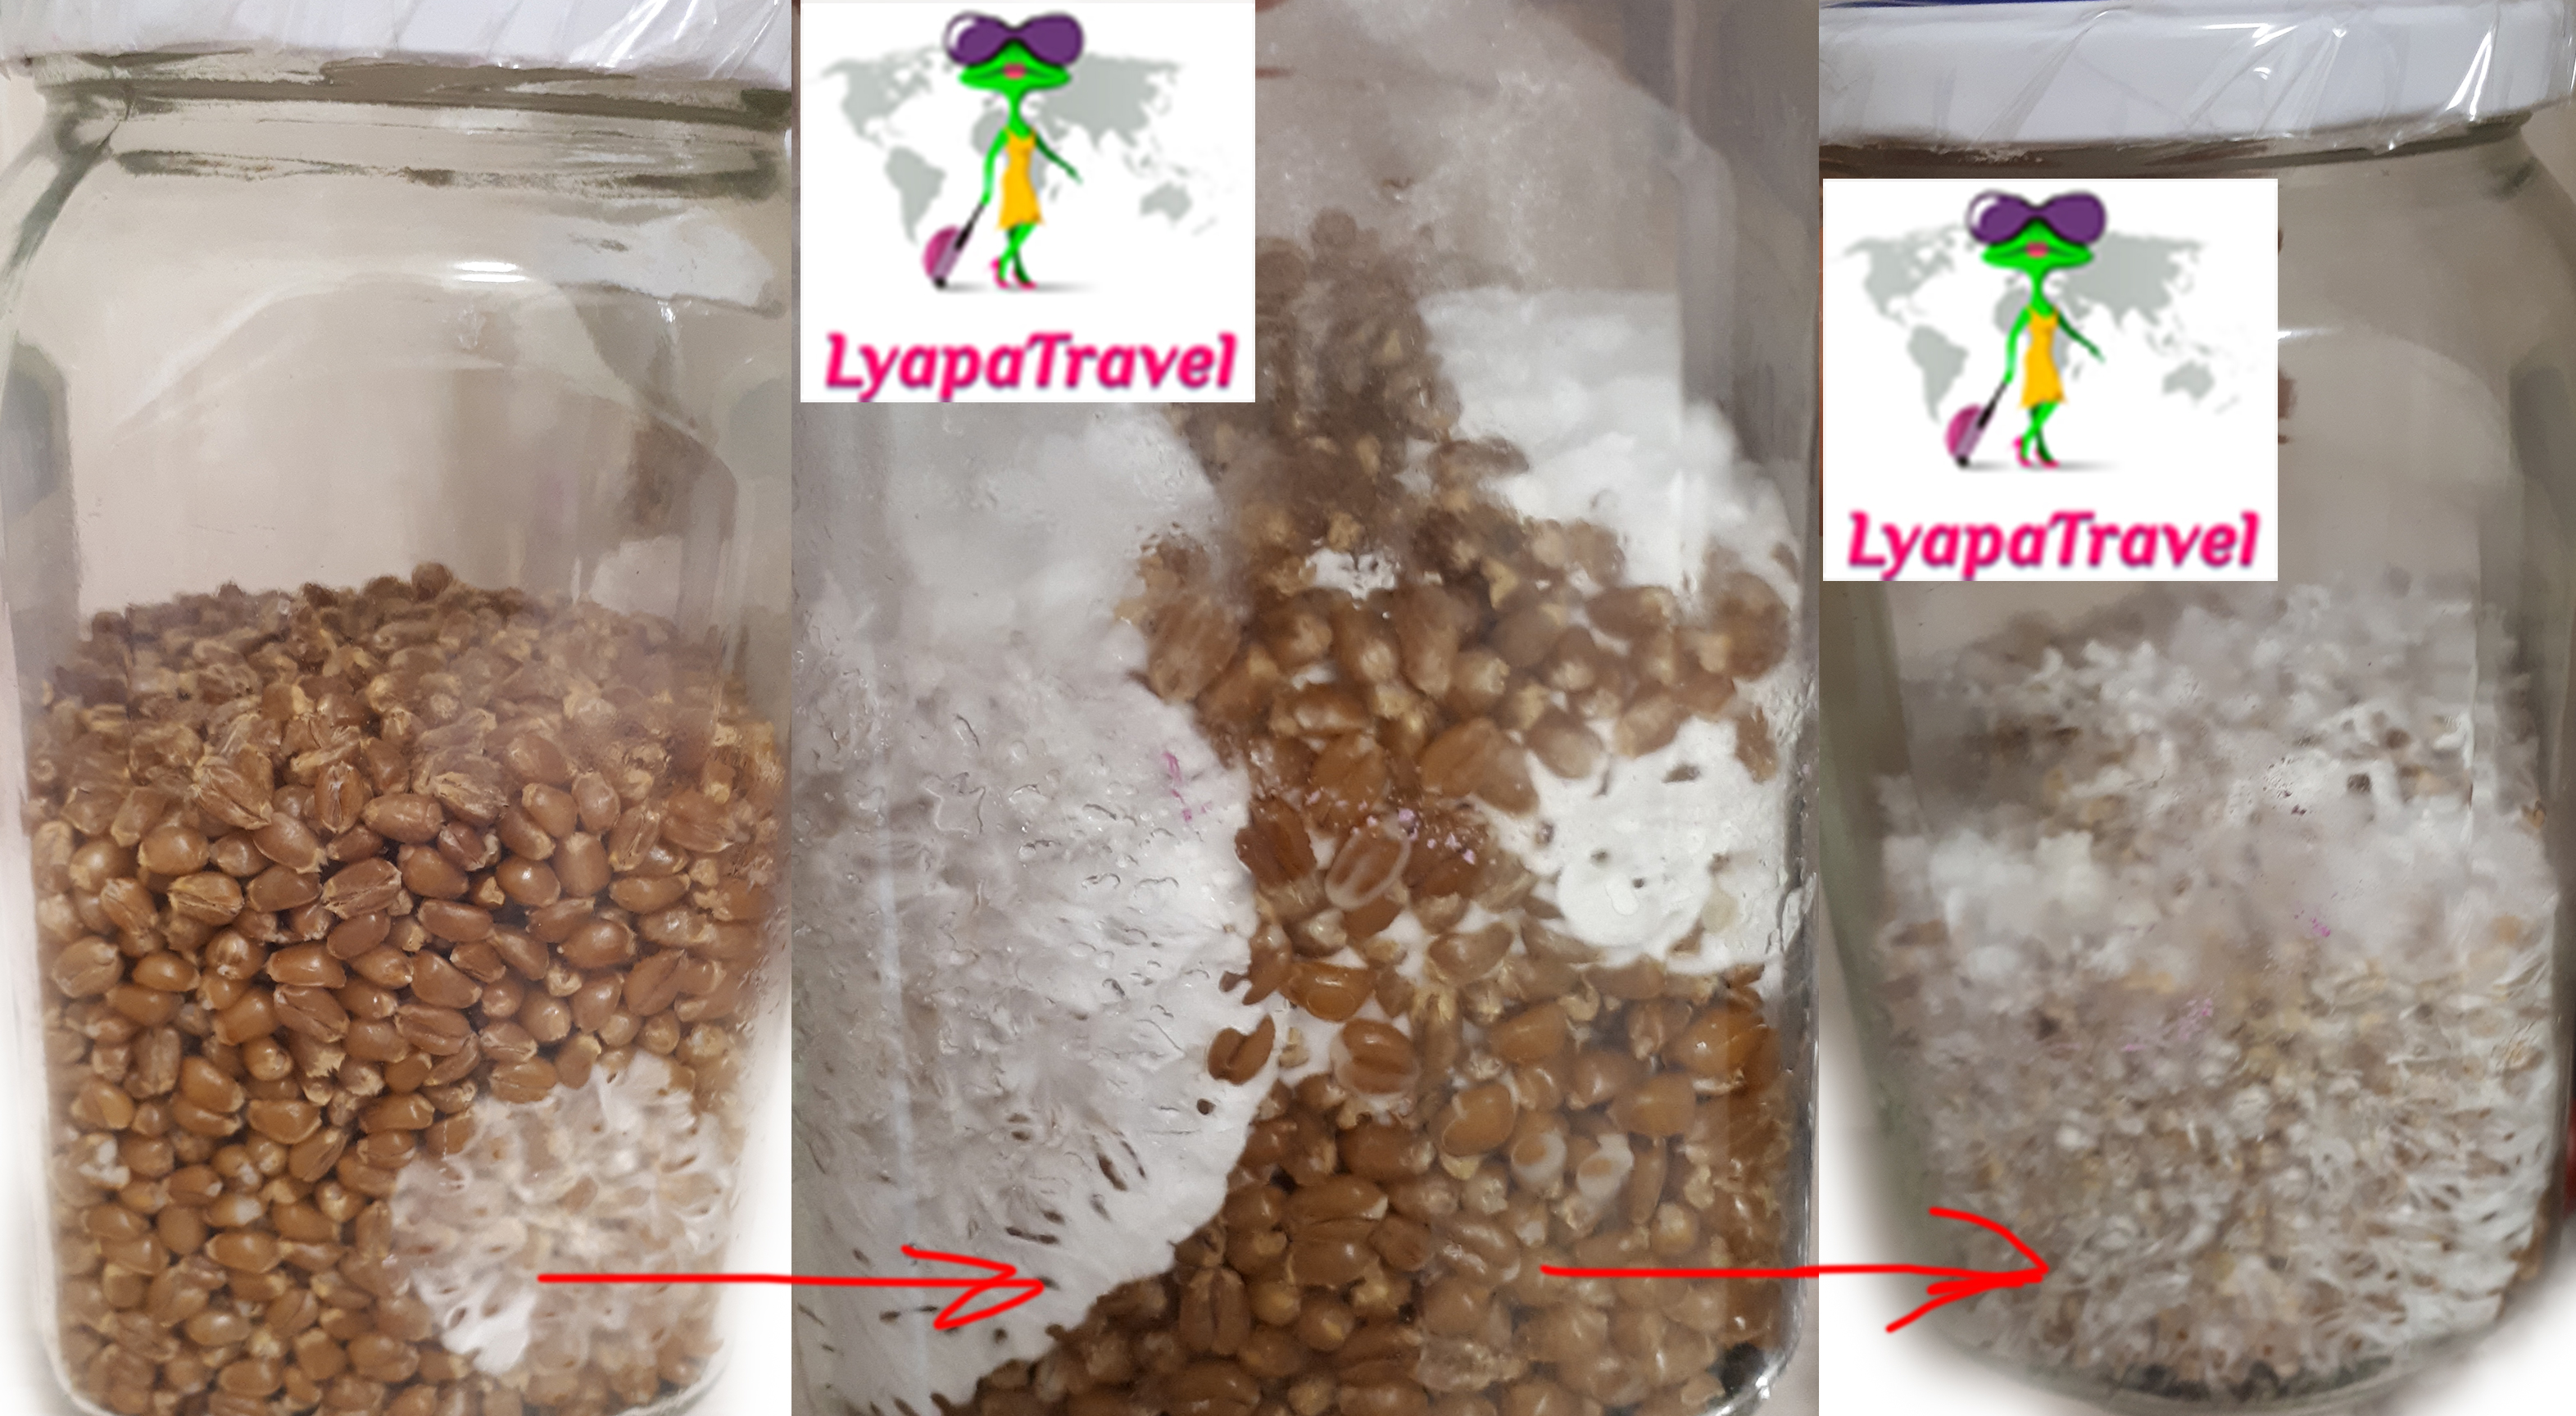
3) Inoculation of sterilized grain substrate with seed from Golden Teacher spores (Psilocybe Cubensis) and mycelium growth in 1 L jars - 1-2 weeks
At this stage it is most important to observe sterility, so we work in gloves, face mask and on a surface wiped with alcohol. If possible, within the radius of the burner or spirit. Nearby no one should not walk, windows should be closed, the air conditioner is turned off - the air should not move) You will need:
- syringe with spores
- sterile grain jars
- alcohol
- flame burner / spirit flame or lighter
- heater
The syringe needle is ignited in a flame and dipped in alcohol to cool down for a second. Then we pierce a cotton disk with the needle and inject the spores into 4 locations of a liter jar, namely on the two opposite walls of the jar and two injections into the grain itself. 1 liter jar = 3-5 ml of spore suspension!
For inoculation of the second jar, sterilization of the syringe needle is repeated.
Jars, after inoculation, put in a dark warm place (necessarily 30 degrees) for 1-2 weeks. The time of overgrowth of the jar strongly depends on the strength of the spores, the humidity of the grain (if the grain is too dry you can add directly to the jars of sterile water, through injection from a sterile syringe), the temperature in the cabinet (low temperature - long will overgrow, high temperature - burn or covered with mold). Only at the end of 7-8th day appear the first rings of mycelium on the walls of the jars, by the end of 14-15 days mycelium takes over the substrate.
4) Preparation of substrate for growth of Golden Teacher fruiting bodies and inoculation of mycelium into the obtained coconut fiber substrate - keying - 4-6 days
This step is also characterized by an increased need for sterile conditions that are similar to mycelium inoculation. You will need:
- Liter jars with metal screw-on lids, no holes!
- Vermiculite (1 liter )
- coconut substrate in briquettes (0,5 kg briquette weight)
- jars with overgrown mycelium Golden Teacher
- tablespoon
- plastic cases 2 pcs
- garbage bags 2 pcs
- heater
We move to this stage when the jars with mycelium on 90-100% overgrown. In the morning we prepare the substrate and sterilize it, and in the evening we inoculate the coconut substrate with Golden Teacher mycelium.
Fill coconut substrate in briquettes with water 1:6. It is better to pour less water than to pour too much. The benchmark for moistening coconut substrate - when you squeeze the wet substrate in your fist should be only drops of water! Excess water will have to banal squeeze)
At the bottom of a liter jar poured 1 cm of vermiculite, then poured over the moistened coconut substrate to 1/2 liter jar. Cover the jar with a screw-on metal lid without holes. On the bottom of the pressure cooker put a piece of cotton cloth, put the jars on top and pour hot water, up to the level of the substrate in the jars. After boiling (closing the pressure cooker valve) sterilize for 30 minutes. After sterilization, put the pressure cooker in cold water until completely cooled. If you do this in the morning, then by evening the substrate will be ready for sowing.
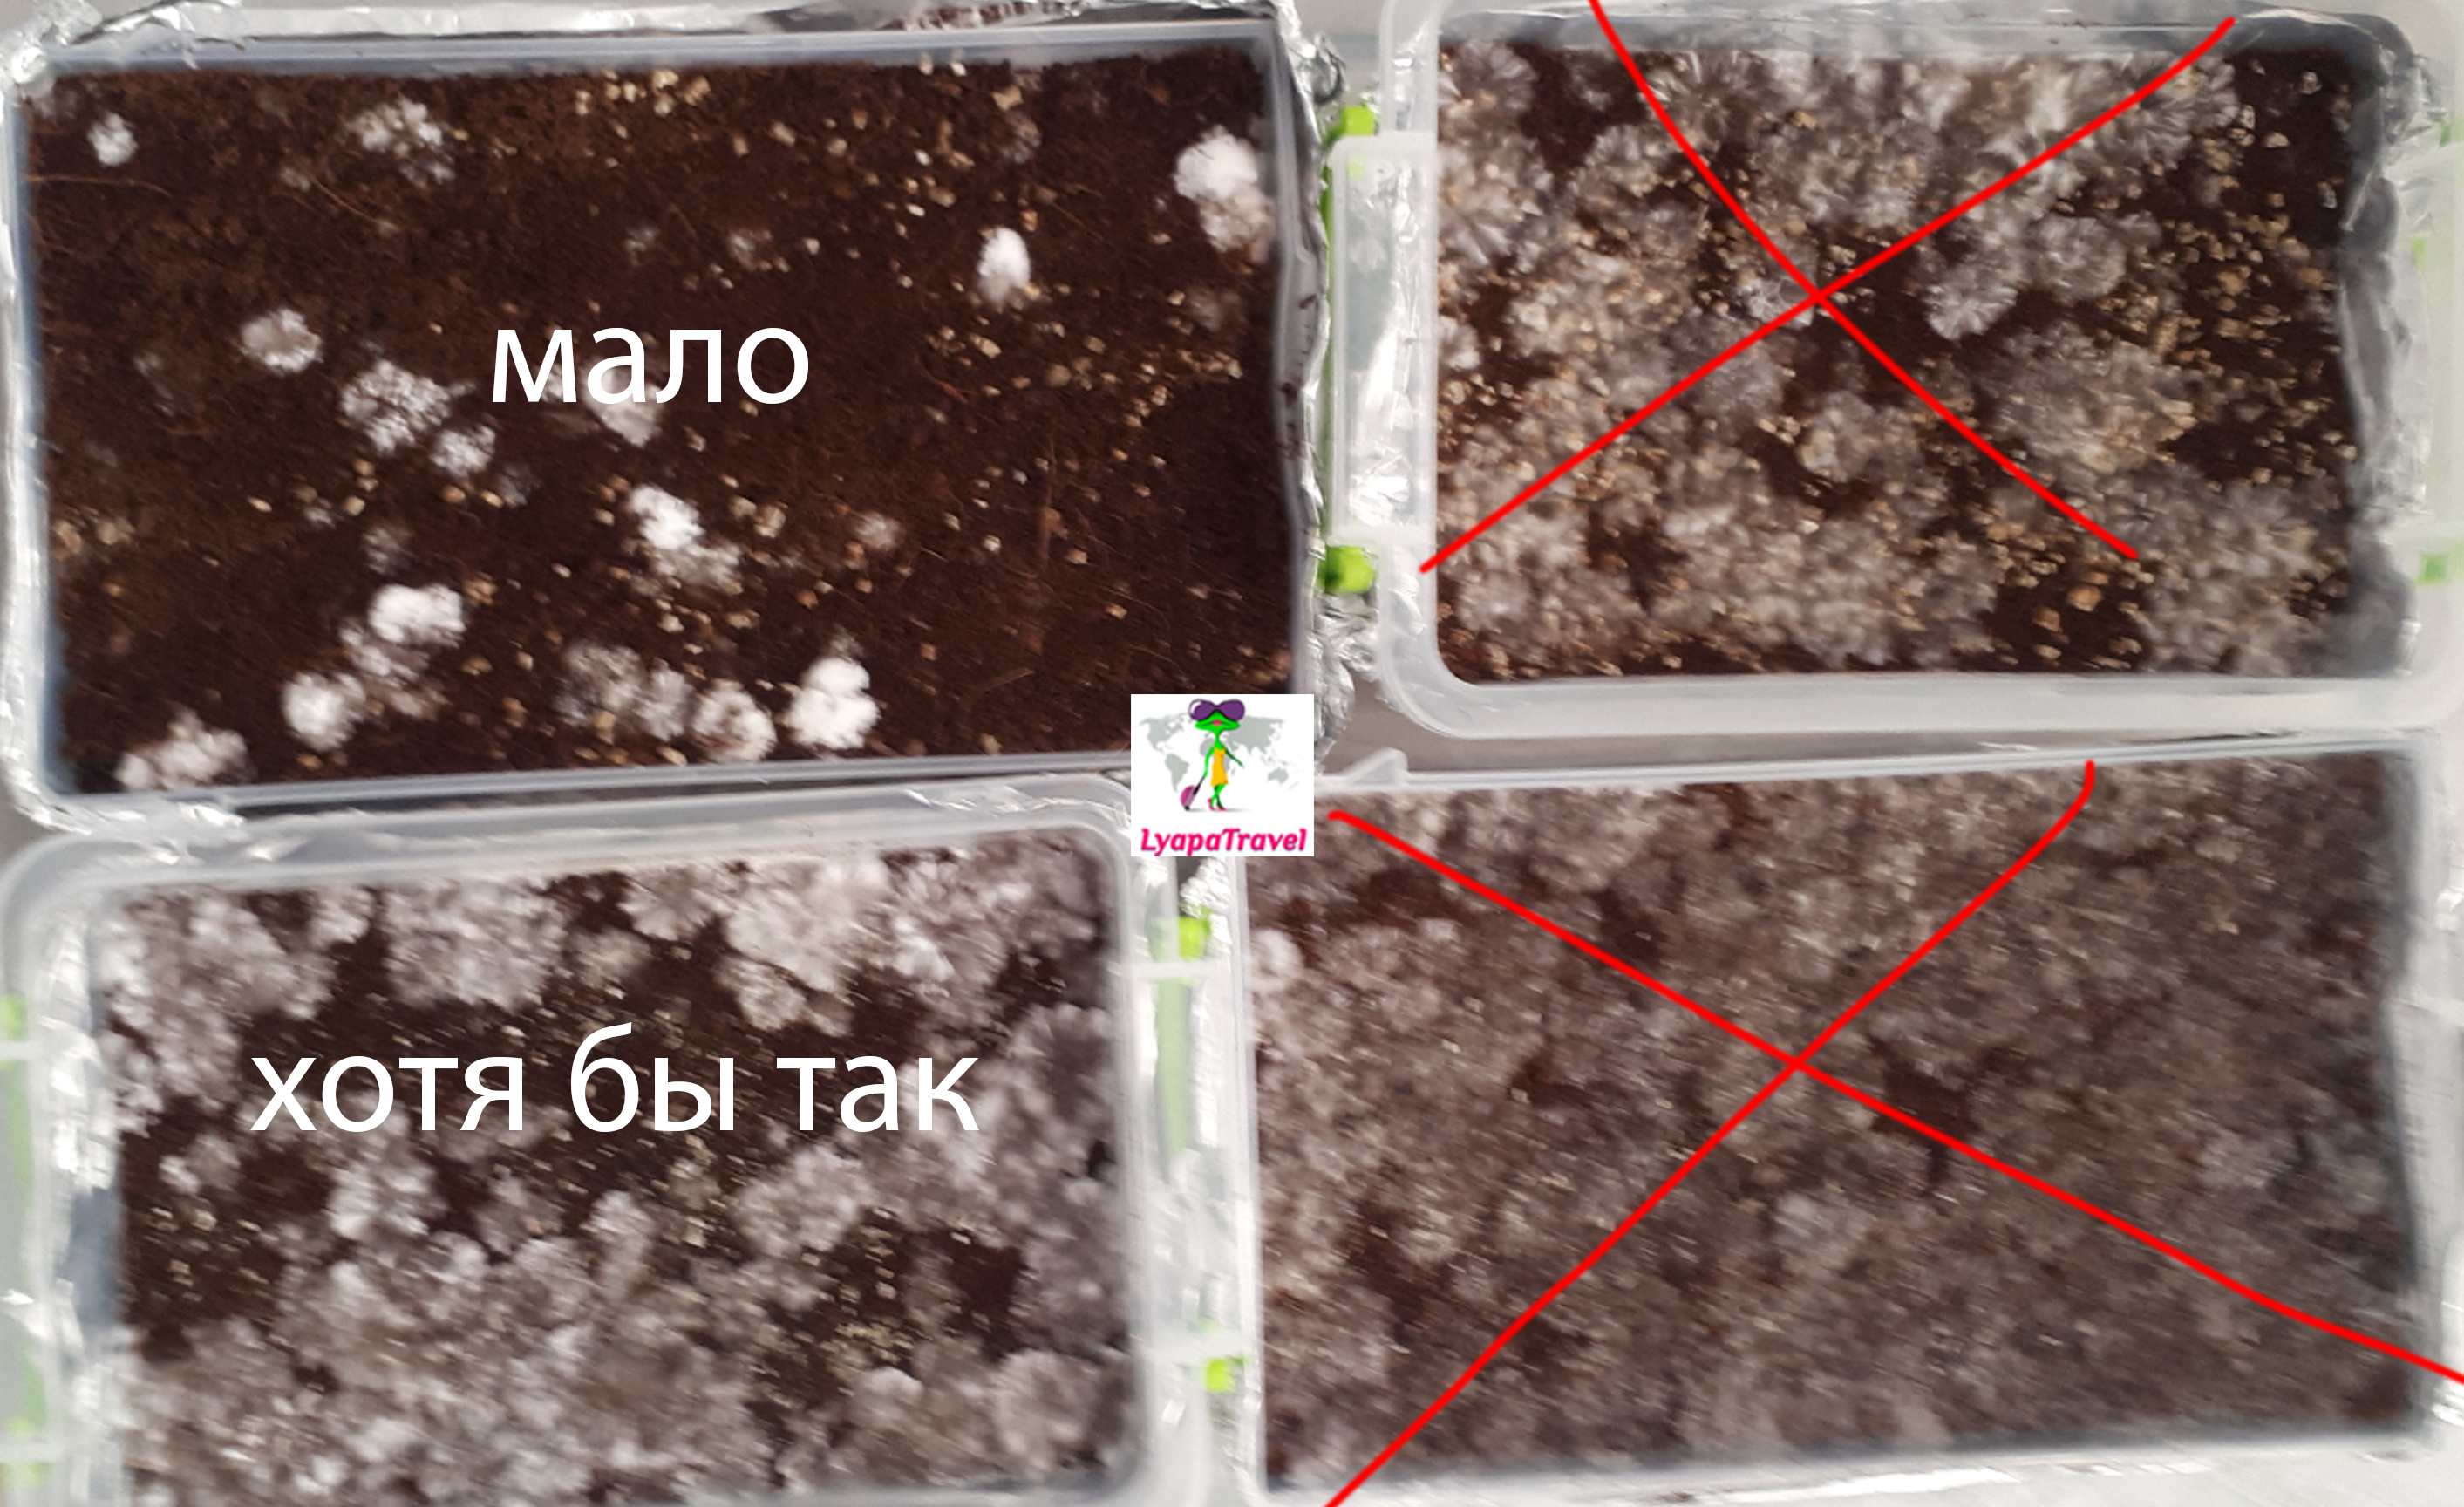
Next, work under sterile conditions!!! In plastic cases with a volume of 2 liters poured from the cooled jars of a mixture of coconut substrate and vermiculite (leaving part for the cover layer), there pour mycelium from other jars. Mycelium take out a sterile spoon (flame + alcohol) and carefully chop it into pieces of 0,5-1cm and mix with coconut in a plastic case. Leveling, not tamping! On top pour sterile substrate 1.5 cm layer!!! Each case is closed with a lid or put in a garbage bag, which is tied at the tip of the bag. The case itself should not be transparent or it should be wrapped with foil on the outside, pressing as tightly as possible against the walls. In this form, we put the cases in a dark closet at a temperature of strictly 24-28 degrees Celsius. Every day open and ventilate, removing carbon dioxide. For 4-6 days mycelium will begin to grow new substrate, on the surface of vermiculite should appear no more than 20% white fluff!!!! If overdue, the mycelium will grow and cover the substrate with a crust (mycelium overlay), which will not allow the formation of primordia - the rudiments of fruiting bodies. Then comes the equally important stage of fruiting.

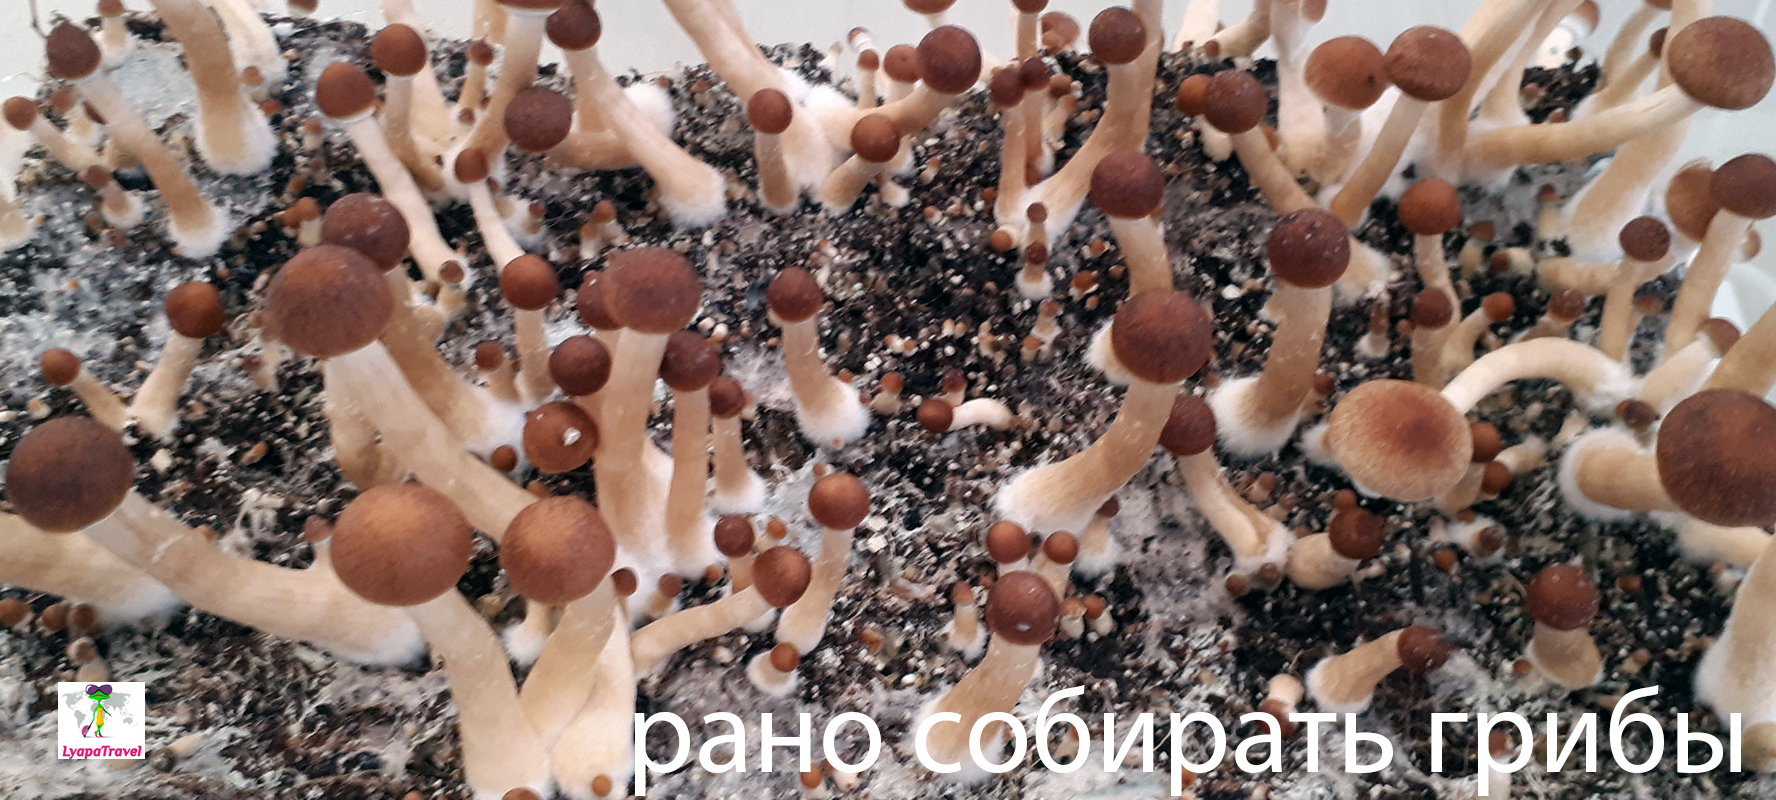
5) Fruiting - Creating conditions for Golden Teacher fruiting bodies to grow in several waves (first wave 1 week)
For fruiting, it is crucial to create the perfect conditions for grooving. You will need:
- a large plastic container with a lid
- keiki that are 20% overgrown with mycelium. The containers under the cakes should not be transparent or should be wrapped in aluminum food foil.
- water and hydrogen peroxide
- conditioner
At the bottom of a large plastic container pour 1-2 cm of water with hydrogen peroxide, at the rate of 2 tablespoons of 3% peroxide per 1 liter of water. Put the cakes in the same place. There must be a distance between them for better evaporation of moisture. Then you need to create the following conditions and strictly monitor their fulfillment throughout the growth of mushrooms:
- Air humidity of 80% and above! You can spray the walls of the container with water several times a day, but it is important that not a drop of water gets on the cakes!!!! You can also hang a cotton cloth on the walls and sprinkle it, so that it holds moisture better.
- Ventilation is extremely important at this stage - you need to ventilate 3-5 times a day, to remove the carbon dioxide formed. But immediately after ventilating, you need to create humidity. Airing can be done by gently waving a piece of paper around the cakes like an opahal. The thing is that carbon dioxide is heavy and is located at the bottom, to remove it, you need to create air movement. Ideally, of course, you need to automate this process by installing a fan at the bottom.
- The temperature should be 22-24 degrees, in no case higher, otherwise will continue to grow and mycelium and will be overlay.
- Lighting should be diffused.
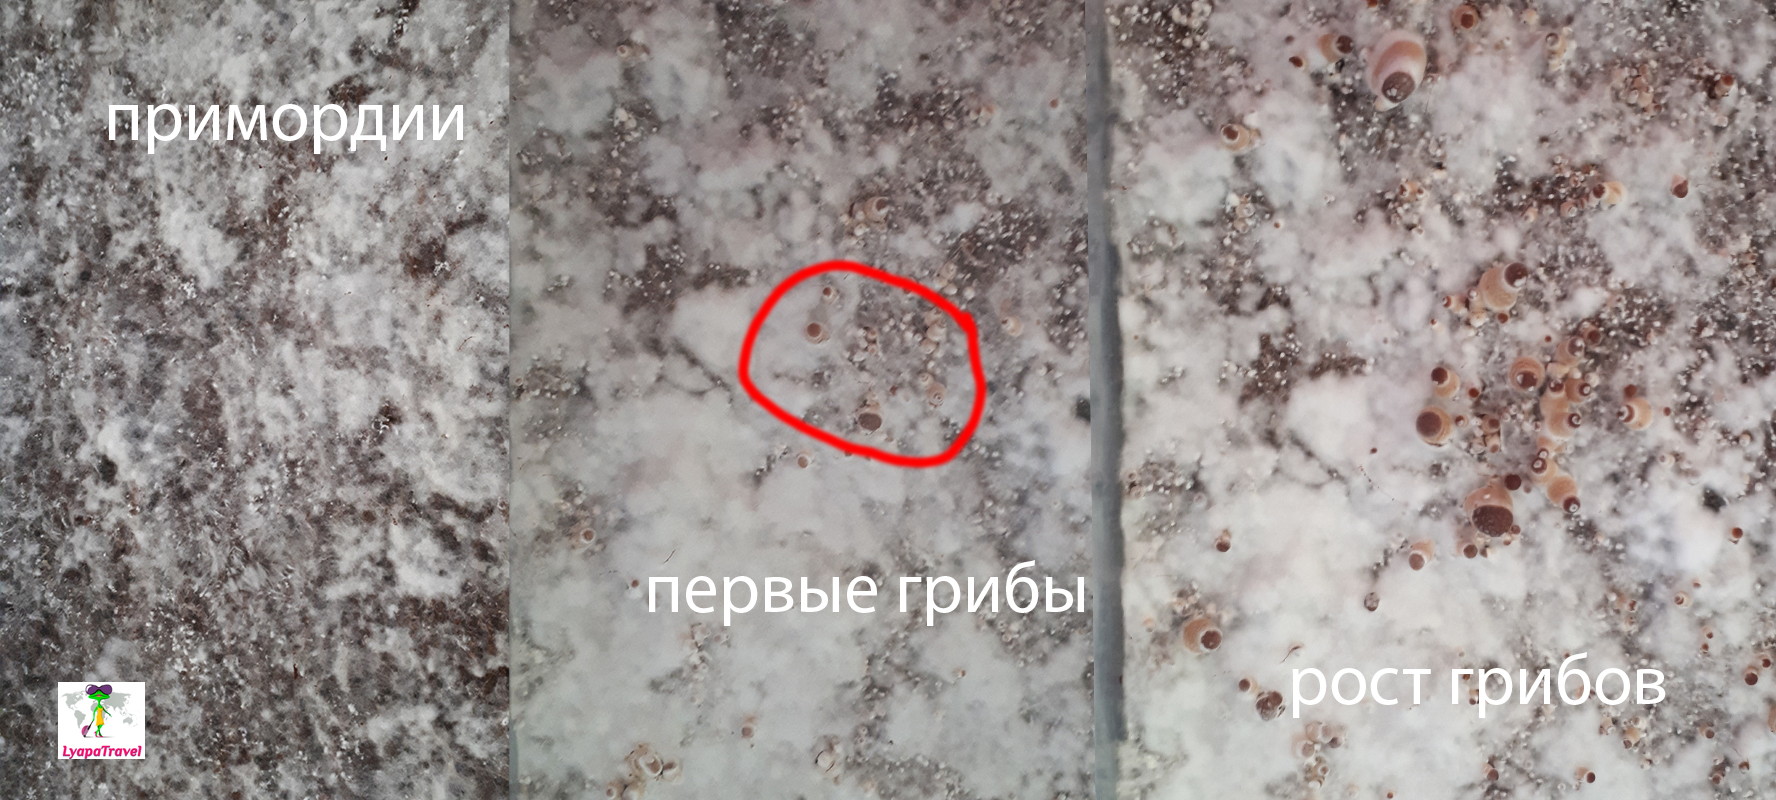
- The first primordia will begin to form in a couple of days, and the first mushrooms in 1 week. Primordia look like small peas of Styrofoam.
6) Harvesting several waves and creating spore prints and drying Golden Teacher (Psilocybe Cubensis) mushrooms for long term storage (3-5 days between waves)
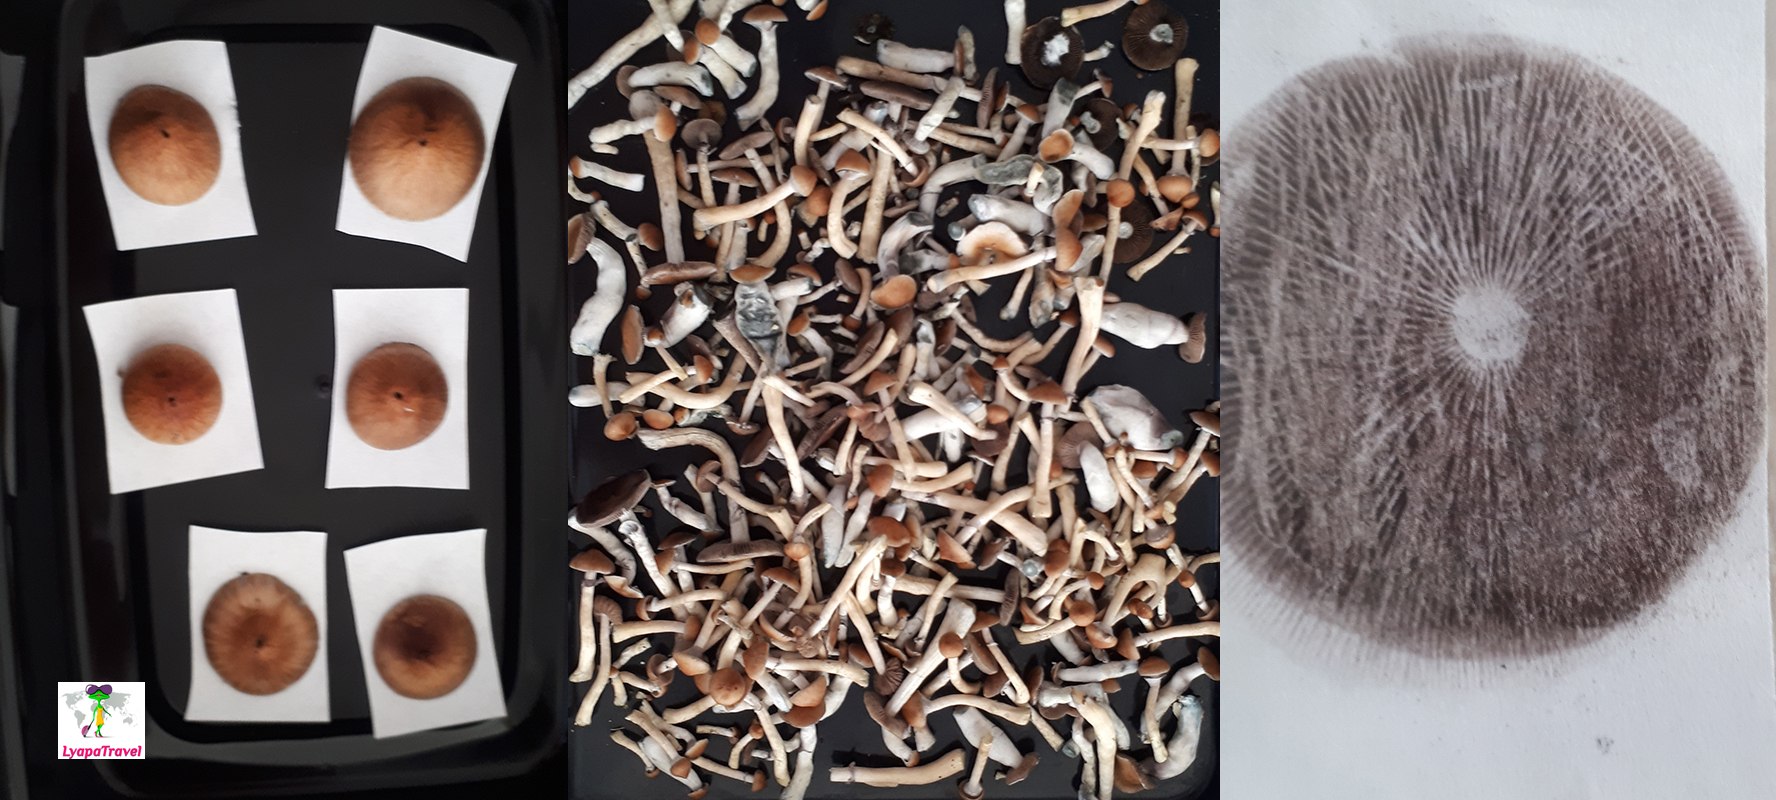
The first wave is harvested when the "skirt" of the mushrooms has stretched and begins to burst. In fact, mushrooms in one cake grow "who wants to" and in fact for harvesting, all the same "integrity of the skirt". But still, it is better to collect ripe mushrooms, and not overripe or not ripe) But for the creation of the imprint of spores is extremely important that the hymenophore remained with spores. In the photo below, a mushroom that is not suitable for making an imprint and a mushroom that is ideal for spore collection are crossed out. The black spots on the caps are the spores that have already exuded from neighboring mushrooms.
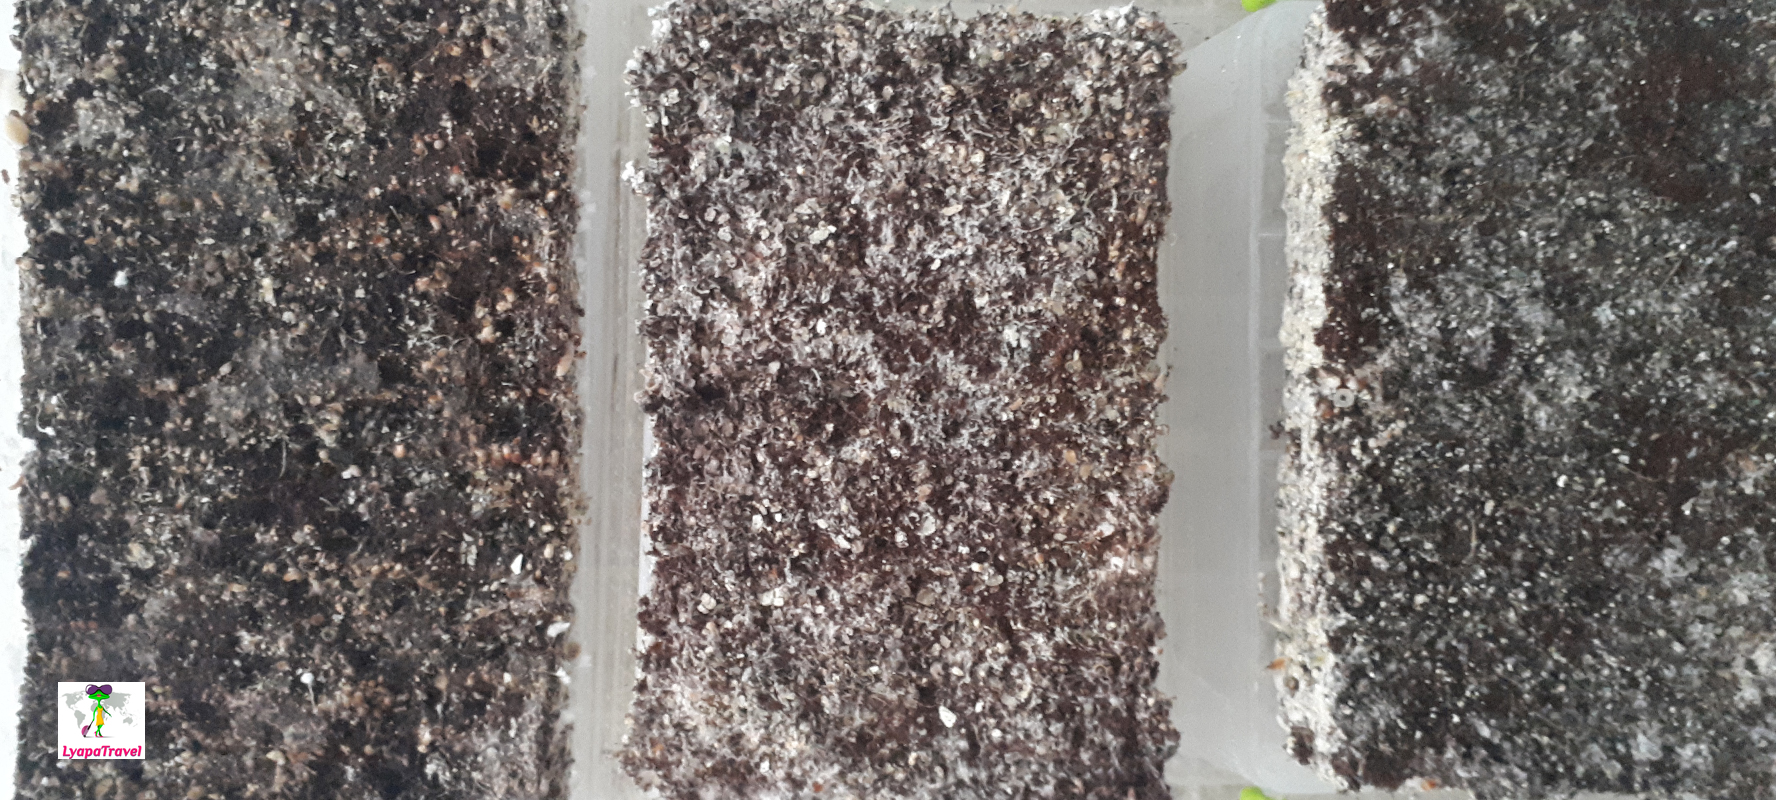
The collection of the wave should be simultaneously on the surface of the whole cake, you can not collect each mushroom individually! The photo below shows two photos - where the mushrooms are not ripe yet and where the cake is ready for wave picking. Mushrooms only need to be twisted clockwise out of the cake, and never cut with a knife. After collecting all the fruiting bodies from the cake, it should be cleaned of any remaining mushrooms and mycelium. Scraping is done with the tip of a knife, by scraping the surface. It is necessary to peel qualitatively, but without fanaticism) Below is a photo after peeling the cake after the first wave.
The peeled cake, after picking the wave is immersed completely in water and placed for 12-24 hours in the refrigerator!!!! This creates cold shock and hydration to stimulate the next wave of mushrooms. To keep the cake fully submerged, it can be pressed down on top with a weighted plate. After refrigeration, the cake is not placed in its plastic container, but placed on top of it! This is how the second wave of mushrooms will grow. It is advisable to harvest a total of 3 waves of mushrooms.
The creation of the cast is done with a sterile knife and sterile needle. The needle is made a puncture in the middle of the cap, the knife is cut under the skirt and the needle is transferred to a sheet of paper, which lies in a clean, dry plastic container. The container is closed not tightly and put in a dark dry place for 2 days! After the expiration of time, the cap is carefully removed and can be dried, and the print is immediately sent to a clean bag on a zipper. The bag is not closed tightly for the first 24 hours, but after 24 hours it is 100% closed. The spores are stored in a dark, dry place. After a month of storage, you need to check the spores. On the back of the paper should be perfectly clean, if there are hints of mold, then such a print is immediately thrown out.
Drying of mushrooms takes place at 30 degrees and ventilation. The degree of drying is determined only experimentally - the mushroom should break with a crunch when bending, not bend. Drying at a higher temperature is not allowed - all substances will be lost!
Mushrooms must be stored under oxygen-free conditions! This is possible if the mushrooms are ground in a coffee grinder and packed in a vacuum packer with sealed end. It is easier to pack 3-5 g in one bag. Stored so mushrooms can 2 years without losing their properties. Further mushrooms also do not disappear, but it may be necessary to increase their amount in one go.


From the imprint of spores to the first wave of Golden Teacher mushrooms (Psilocybe Cubensis) takes 1-1.5 months, the full collection of all three waves is possible in 1.5 - 2 months.
The article is of an introductory nature. It is intended for educational purposes in the process of training mycologists!
For a better understanding of what psilocybin mushrooms are, how and why to use them, you can read a review informational article, including on wikipedia.
Add new comment